Base de connaissances Šikula Robotik
Connecting BeagleBoneBlack
This is the second article of a series about BeagleBoneBlack by Šikula Robotik association. In last post, we have seen how to setup a Linux distribution on BBB and what happens during boot process. We will now connect the BBB to the network, firstly by using a traditionnal Ethernet port, and with an Ethernet-over-USB link afterwards. Wireless connections are out of scope in this article.
![]()
Traditionnal Ethernet link
To begin, let's plug a cable to the Ethernet port on board. It behaves exactly like a traditionnal NIC on a computer, thus we can ask the router for a dynamic IP address with classical DHCP protocole (“dhcpcd eth0”).
Passing details, this command will start a DHCP client daemon which will ask the router for an IP address, and than configure IP address, network mask, gateway, DNS servers addresses and so on depending on the answer. Of course, on a network without DHCP server, traditionnal network commands (ifconfig, route, ip...) have to be used.
When configuration is done, we have to check if web servers can be reached (“ping fsl.com”). If there were not the case, you would have to investigate. As this part is exactly the same as Linux systems on desktop or laptop computers, there are plenty of ressources on the Web. On our board, it works well.
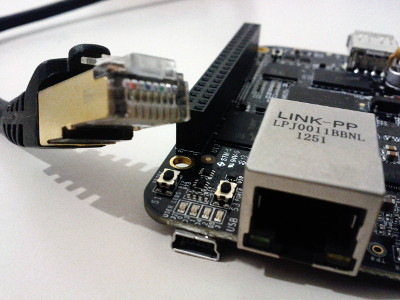
Ethernet port of the BBB and the cable coming from router
Right, but it would be better if the DHCP request were automatic when cable is plugged. Here comes ifplugd service. This service will ask for an IP whenever Ethernet cable is detected.
Because the packet comes with a configuration for eth0, the only things to do are to ask the package manager to setup the program (“pacman -S ifplugd”) and enable the service (“systemctl enable ifplugd@eth0.service”).
It is already ready and will be effective on next boot.
Network over USB
In addition to Ethernet, it could be useful to connect through USB. A console access can be interesting, but a network link would be even more awesome.
BeagleBoneBlack has USB-OTG hardware which enables the board to act as an USB device. We will use this ability to make the board behave as a usb-net device and establish an IP connection thanks to kernel's USB gadget functionnality.
USB gadgets are kernel drivers that allow a Linux system with appropriate hardware to act as USB device. A specific API allows developpers to write such drivers. Fortunately there exists some already written drivers included in Linux sources. These drivers allow the board to be discovered as serial link, human interface device, webcam, etc. In our case, an USB gadget called g_ether will transform the BBB to an Ethernet-over-USB device.

BBB will be seen as an Ethernet-over-USB device
Notice that only one gadget driver can be loaded at the time. When configuring the kernel before its compilation, we choose in a menu which one will be compiled into the kernel. Another solution is to compile several of them as modules. This variant is used in ArchLinuxARM kernel, like in most other distribution's kernels.
When built as modules, the drivers are not included into the kernel binary image. They become auxillary binary files (.ko extension is used for kernel objects) that can be dynamically loaded into the kernel at runtime. These files must be present in the target's filesystem to be used. In the case of our gadgets, they are located in /usr/lib/modules/
For example, we can load g_serial with “modprobe g_serial” command (some parameters can be provided, but default ones just work). This creates a /dev/ttyGS0 node on board. On host computer, a serial-usb device is detected and a /dev/ttyACM0 node is created. We can now open these nodes with a serial terminal such as "screen" and exchange serial data, as with any classical serial links in Linux.
    On board:

            screen /dev/ttyGS0

    On computer:

            screen /dev/ttyACM0

    Remember that screen exits with "Ctrl-A k y" keys
In our case, we want to load g_ether module, but g_serial gadget is now already loaded. As modules insertion is not permanent we could simply reboot but we would lost all other temporary configurations. A better solution is to unload module with “modprobe -r g_serial” command.
Now we can load g_ether module (“modprobe g_ether”) and list all network interfaces (“ifconfig -a”). The usb0 network interface is present as expected.
To make this interface permanent, the module has to be loaded at each boot. A special directory is present in ArchLinuxARM for this purpose. We just have to create a file /etc/modules-load.d/g_ether.conf with this content:
    # Load g_ether.ko at boot
    g_ether
After reboot, the usb0 interface is present.
Usb-net automatic IP
Althrough we can set IP addresses manually, it would be more convenient if it could be automatic. Moreover, this would allow to work without serial debug link most of the time.
To begin, we install a DHCP server thanks to the packet manager (“pacman -S dhcp”). Than we edit its configuration file /etc/dhcpd.conf, which is self explanatory:
    # dhcpd.conf

    default-lease-time 600;
    max-lease-time 7200;

    subnet 192.168.2.0 netmask 255.255.255.0 {
        range 192.168.2.10 192.168.2.20;
    }
The next step is to activate the service on boot (“systemctl enable dhcpd4.service”), but it will not be sufficant. The usb0 interface should have a static IP address in order the on board DHCP server to know which interface is linked to the subnet.
So we will create a static ip configuration in /etc/conf.d/network@usb0
    address=192.168.2.1
    netmask=24
    broadcast=192.168.2.255
and a service /etc/systemd/system/network@.service
    [Unit]
    Description=Network connectivity (%i)
    Wants=network.target
    Before=network.target
    BindsTo=sys-subsystem-net-devices-%i.device
    After=sys-subsystem-net-devices-%i.device

    [Service]
    Type=oneshot
    RemainAfterExit=yes
    EnvironmentFile=/etc/conf.d/network@%i

    ExecStart=/usr/bin/ip link set dev %i up
    ExecStart=/usr/bin/ip addr add ${address}/${netmask} broadcast ${broadcast} dev %i

    ExecStop=/usr/bin/ip addr flush dev %i
    ExecStop=/usr/bin/ip link set dev %i down

    [Install]
    WantedBy=multi-user.target
and finally enable this service (“systemctl enable network@usb0.service ”)
BBB can now be rebooted. The development computer will see an Ethernet interface, try to connect with and get an IP in this little network.
Network opens possibilities
Network connection to the BBB is far more interesting than a serial console. Sure we can access to a shell by connecting to SSH server (it is launched by default in ArchLinuxARM), but it is not the only option.
In fact, we can virtually do anything that a network permits: hosting a web server, browsing the Web, playing online games, checking e-mails, chatting, accessing data on NAS... Let us focus on two usefull usages in our robot.
The first one is having access to the files. Thanks to SSH server, we can copy files from target to host or host to target. The syntax is “scp
Another usage we have is to gather data. While doing its job, the robot sends a lot of data he collects, such as its estimated position, its wheels speeds, sensors values, and so on. Most of these data are lost few milliseconds later because of obsolescence. On developpment computer, we can receive these data and process it the way we want (mostly in live) to avoid storing gigabytes of raw data on board just for debugging. The way around, we can send data back to the robot. It can be used to control it or change its parameters without reprogramming.
Next article
This is the end of the second post. Next one will talk about compilation, cross-compilation and distributed compilation.