Base de connaissances Šikula Robotik
Unboxing BeagleBoneBlack & replacing factory Linux distribution
This is the first article of a series about BeagleBoneBlack by Šikula Robotik association. It briefly presents what is included in the package, than explains how to setup another Linux distribution which is ArchLinuxARM and details what happens during boot process.
![]()
Šikula Robotik and BeagleBoneBlack
As a robotics' association, Šikula Robotik builds robots. For the French robotics' cup 2014, we decided to power the robot with the recent BeagleBoneBlack.
BeagleBoneBlack is an open-source development board from BeagleBoard.org Foundation. It has a AM335x 1GHz ARM® Cortex-A8 processor with 512MB DDR3 RAM so it can run complex systems such as Linux. In our context, it has some usefull peripherals, such as I²C, PWM, lots of GPIO and even two QEP to decode (in hardware) the signals from rotary encoders that we use to measure movement. There is also an embedded 2GB memory ; but the purpose of this article is not to present the board itself, so I will stop here. Detailed presentations are widely available on the Internet anyway.
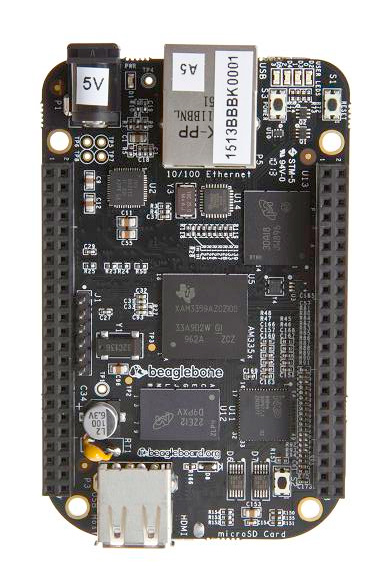
The Beagle Bone Black
At time writing RS sells it 48,08€ (VAT included). Thanks to our partnership with RS, we had a little discount. This allowed us to buy several BBB so that we can work on the same system separately, which is very usefull when developers are separated by hundreds of kilometers.
The BBB comes in a little carton in which we find an USB cable, a quick start guide and the BBB itself. Let's plug it and see what happens. Power led switches on and a few seconds later, users' leds blink. On the computer, a USB drive appears a little later and a usb-net interface offers a network connection to the board. A connection to http://192.168.7.2:3000/ displays a nice programming interface directly hosted in the factory distribution on board. Pretty cool, lots of things could be done with that... but Šikula Robotik will not use this system at all.
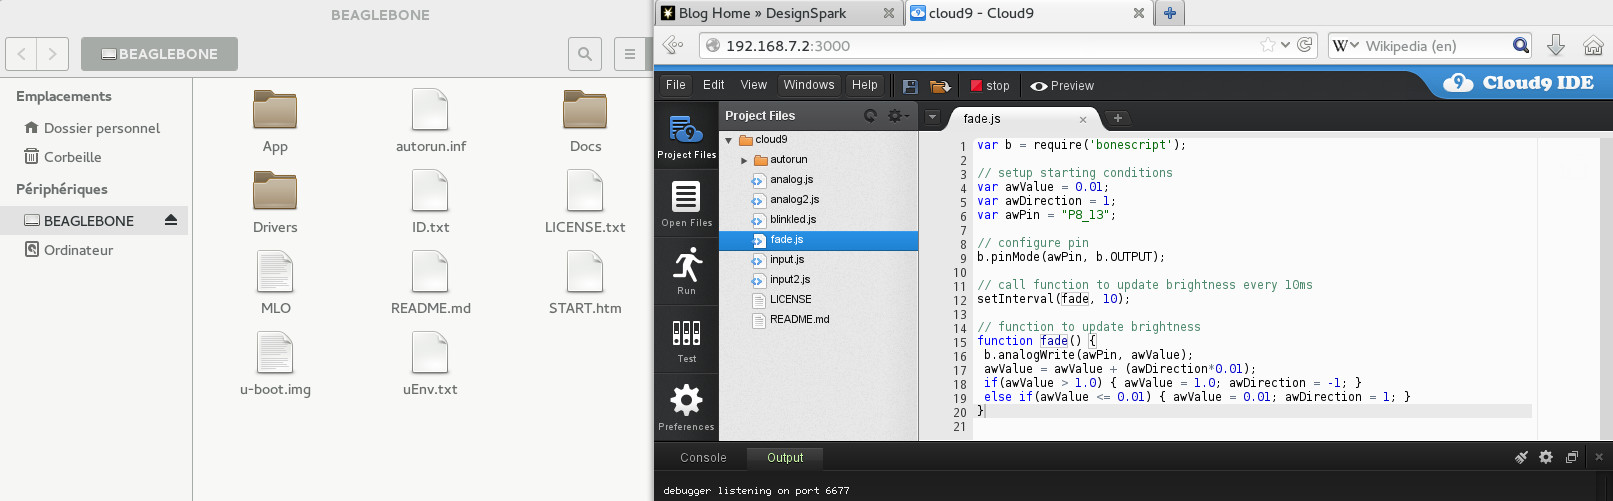
Factory Linux distribution appears as mass storage device and has embedded script editor
Installing another Linux distribution
Let's begin to setup another system on the board. For this first step, we will use the SD card as root filesystem medium (all Linux stuffs are stored on SD card) so that it can easilly be flashed and replaced, and so on.
Here we chose ArchLinuxARM, which is a Linux distribution for ARM computers. There are others distributions that can run on BBB, such as Gentoo, Debian, Ångström, LinuxCNC, Fedora, Ubuntu, Android... but as a several-years-user of ArchLinux on laptop, I prefer this one. Althrough ARM is not an official architecture supported by ArchLinux, ArchLinuxARM is a separated projet that shares ArchLinux's spirit and tools and in fact, it is very close to it.

ArchLinuxARM logo
On their website <http://archlinuxarm.org/>, there is a menu with all the boards the ArchLinuxARM team officially support. At time writing, there are 35 officially supported boards. BBB can be found in Platforms > ARMv7 (its ARM core variant) > TI (its processor's manufacturer) > BeagleBone Black.
The page presents the board in the tab “Overview” while instructions are given in the “Installation” tab. Just have to follow instructions to make the bootable SD : partition, format, and populate with initial data. Eject the SD card and put it in the BBB. That's all.
Understanding the boot process
To see what happens, we plug a 3.3V LVTTL USB-serial converter on the serial header J1. The connector follows the FTDI cable pinout, with GND signal next to the dot printed on board.

BBB's serial header pinout
Power up the board, with SD card in its slot and boot button pressed (this is the button located in the SD area, you cannot miss it). The board boots in several stages.
The first stage is the ROM code inside the AM335x processor, a vendor-specific very tiny execute-only code which only purpose is to find and load the “Secondary Program Loader” from different media supported by the processor (raw NAND flash, SD card...).
The second stage is thus the SPL. Because it is loaded into internal RAM, it has to be quite little. Basically it initializes few essential components for the next stage, especially SD controller from which to load the bootloader and external RAM controller into which the code will be stored and executed. BSL prints messages on serial debug bus, starting with its name “U-Boot SPL 2013.04-dirty”. On the SD card, it is contained in the MLO file.
When bootloader is in (external 512MB) RAM, it is executed. On console, we can see “U-Boot 2013.04-dirty” which is the first message from the bootloader named “(das) U-Boot” here. It has lot of space to do its job now. It can do a lot of things such as talking to i2c devices, reading files, have Ethernet connections... in order to fullfill its mission : loading the kernel. On the SD card, it is contained in the file u-boot.bin.
For development purposes, kernel is usually loaded from network ; on the board, it can be loaded from eMMC or SD card. In our case, U-Boot is configured to find a script on first partition. It loads it and execute it.
This script uEnv.txt does a lot of things, but we can summary it as : find zImage (the kernel) on second partition and load it in RAM, than load am335x-boneblack.dtb (a file that describes hardware) from second partition, and boot the kernel giving it the dtb file. [There was an error in boot script (it uses bootm command instead of bootz for a zImage) but a ticket was already present on bug tracker. It will probably be fixed soon.]
“Starting kernel ...” : this is the last message of the bootloader. Now the kernel self extracts and starts initializing all the hardware and software we use. From this point, older bootloader programms that have run before do not exist anymore in RAM : Linux has total control !
When kernel is ready, it launches the first userspace process known as the init process. In ArchLinux the init programm is systemd. This phase starts with “Welcome to Arch Linux ARM! ” message. Init programm launches daemons and lots of things and finally the system is ready and displays a prompt.
The whole start process took 16s on my board.
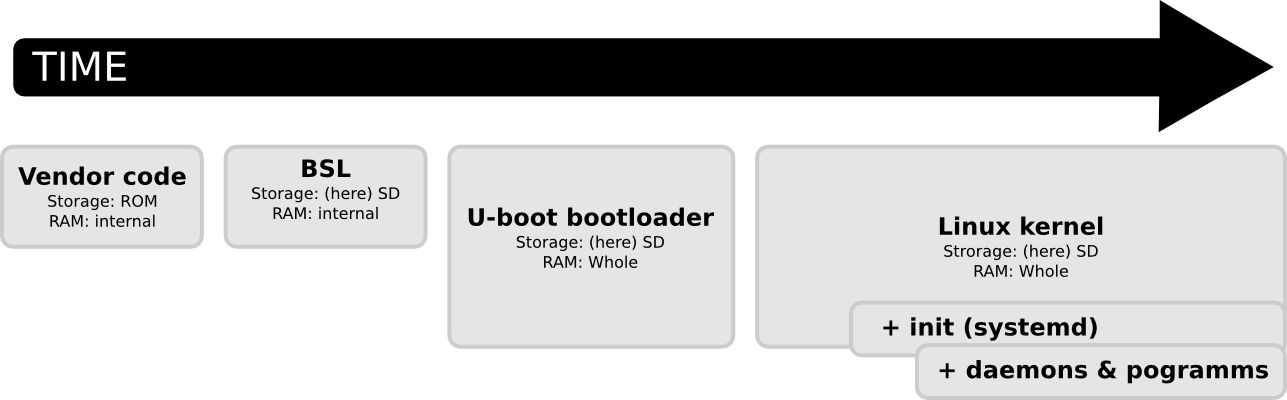
Boot process in image
Next article
This is the end of the first post. Next one will talk about wired networks and especially network over USB.